Showcase Creator Documentation
User's manualShowcase block
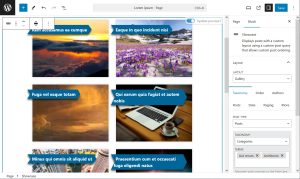
It’s a Gutenberg block that lets you filter posts and render them via a Layout.
The block controls:
Layout: A select menu to choose the Layout.
Filters for the post query are arranged in tabs.
Taxonomy tab:
The first thing here is to select the post type you will be working with.
Post types
WordPress houses lots of different types of content and they are divided into something called Post Types. A single item is called a post, however this is also the name of a standard post type called posts. By default WordPress comes with a few different post types like Posts, Pages, Media etc. [1]
Taxonomies
A taxonomy within WordPress is a way of grouping posts together based on a select number of relationships. By default, a standard post will have two taxonomy types called Categories and Tags which are a handy way of ensuring related content on your website is easy for visitors to find. These two types of taxonomies are included in WordPress by default, but just like any other taxonomy, can be removed or changed and you can even add more if you like. [2]
Taxonomies & Terms
The relationship between taxonomies and terms is rather simple; think of taxonomies as the ‘parent’ and terms as the ‘children’. For example, a taxonomy called ‘Recipes’ for the ‘Food’ post type could have multiple terms such as ‘Vegetarian’ or ‘Fresh’, ‘Easy Cooking’. [3]
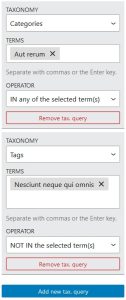
Filtering posts by using taxonomy queries is when you want certain terms to be present or absent from posts. For example, you may want to filter posts that are in a certain category. In this case you need to add a tax. query, select Categories as Taxonomy and add the desired category in Terms. Note that the operator is IN. If you want posts that are not in that category, use the NOT IN operator. Note that you can add multiple terms in a single tax. query.
Multiple taxonomy queries and their relationship:
You can have multiple tax. queries. In that case, you should know that there are two types of relations between them: One type is AND (all must be true) and the other is OR (at least one must be true). In case you choose AND – you will get posts that fulfill all tax. queries. In case OR is selected – you will get posts that fulfill at least one of the queries. In the second case, more posts should meet the criteria.
Order tab:
Here you define how you want to sort your posts.
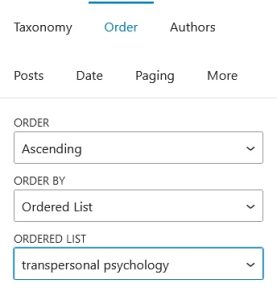
Order – sorts the posts Ascending or Descending.
Order by – types of sorting to choose from:
- Date – date of publication
- Modified – last modified date
- Title – alphabetical
- Author – author’s display name – alphabetical
- Menu order – sort by the Order field set when editing a page
- Random – randomized order
- Meta value (alphabetical)
- Meta value (numeric)
- Relevance – for search results
- Post ID
- Parent ID (for hierarchical post types like pages)
- Comment count
- Ordered Lists – Manually sorted posts. See Ordered Lists section.
In case Meta value is selected, a text field appears for entering a meta key. Metadata, also known as Custom Fields, consists of a key and a value. Custom fields can be assigned to any post. Their role is to store additional data about the post.
If the Ordered Lists option is selected, a drop-down menu is displayed with the available lists. Ordered Lists are part of Showcase Creator. See the relevant section of this documentation for more information.
Authors tab:
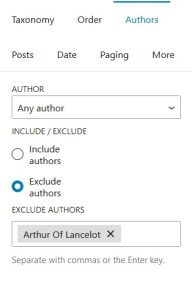
Here you define whether and how to filter posts by author.
By default, the Any author option is selected in the Author menu. If you wish to display posts of only one of the authors, you must select the desired name from the menu.
To see posts from multiple authors you need to set the Include authors option and type the authors’ names in the field below to add them.
Another way to filter posts is to exclude posts from certain authors. This is done by setting the Exclude authors option and adding the authors you want to exclude in the field below.
Posts tab:
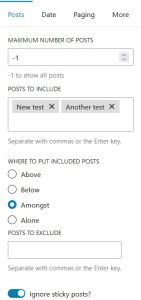
In this tab you can set:
- the number of posts to display
- specific posts you would like to include in the query and their location
- specific posts you would like to exclude from the query
- ignore sticky posts
By default, the maximum number of posts is set to -1, which means unlimited. If a positive number is set, the number of posts will be limited to that number.
If you want specific posts to be added to the query, you can type their titles in the Posts to include field.
Similarly, you can add the posts you would like to exclude from the query in the Posts to exclude field.
If you specify Posts to include, you might want to set where to put the included posts. Possible options are:
- Above – puts them at the beginning.
- Below – puts them at the end.
- Amongst – tries to sort them among others depending on the “order by” option.
- Alone – will show only the included posts.
When editing a post, if you check Stick to top of the blog the post becomes sticky. It will appear in all queries unless the Ignore sticky posts option is turned on. This option is on by default because it is assumed that it is more common to ignore them. Turn it off in case you want sticky posts in your query.
If a hierarchical post type (such as Pages) is selected, more options become available:
A switch to choose whether to show Top level only or include children posts.
If the Top level only switch is off, you can also select parent posts to include or exclude their children by entering the post titles in the Include /excludeposts within fields.
Date tab:
In this tab you can set to show posts from a certain date, period, etc.
By default, any date is selected, which means that posts from any date are accepted. But if you want posts from a specific date, period, etc., the following options are available:
- This year
- This month
- This week – Will show this week posts.
- Today
- Year/Month/Day
- Some time ago
- After/Before
It goes without saying that the first four options only show posts from this year / month / week / day.
When the “Year/Month/Day” option is selected, three fields appear – for year, month and day. No field is required, but at least one must be used for it to work. For example, if you want posts from every 5th day of the month, you can enter 5 in the day field. Or if you want posts from January each year, select the month and leave the other fields blank.
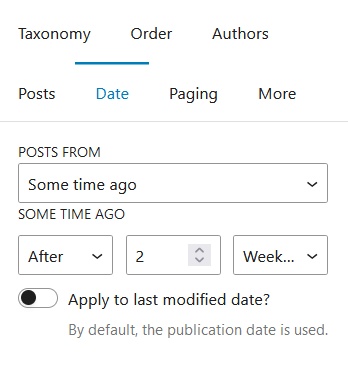
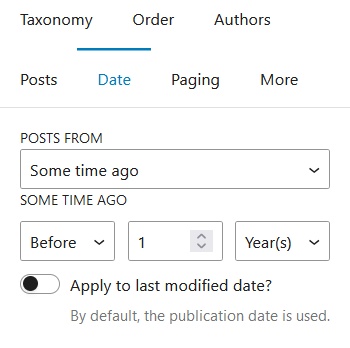
When you select the “Some time ago” option, three fields are displayed again. The first sets whether to take the posts before or after the given time. The second field sets the quantity. And the third field sets the units – days, weeks, months or years. What is this option used for? For example, if you want posts from the last two weeks, you should set the first field to after, the second field to 2, and the third to weeks. Or if you want old posts dated one or more years ago, you should set the first field to before, the second to 1, and the third to years.
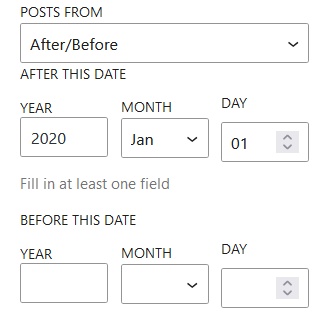
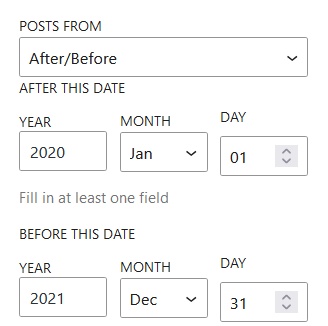
The “After/Before” option allows another way to filter posts by date. This option calls up 2 groups of 3 fields each. The first group, labeled “After this date”, sets the date after which to include the posts. The second group, labeled “Before this date”, sets the date before which to include the posts. Posts that do not meet these conditions are excluded.
You should know that you don’t need to use both groups. For example, you might want posts after a certain date, such as 2020. Then you should fill in “After this date” like this: 2020 as the year, January as the month, and 1 as the day. The result will be the posts from 2020 until now.
But if you want posts from January 2020 to December 2021, you should also fill in “Before this date” as follows: 2021 as the year, December as the month, 31 as the day.
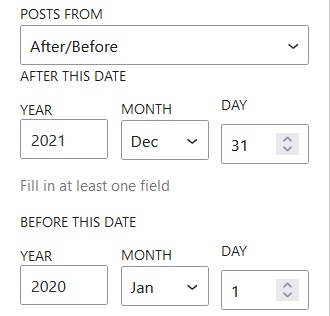
It is also possible to exclude a period of time. For example, posts from the years 2020 and 2021 may be excluded. To do this, enter 2021 December 31 for “After this date” and 2020 January 1 for “Before this date”. The result will be any posts, but not those from 2020 and 2021.
Paging tab:
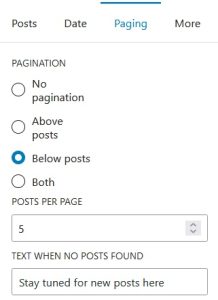
Here you can configure the number of posts per page and the pagination.
If you don’t need pagination at all you can choose No pagination. This will result in showing all posts on one page.
The other three options use pagination and each of them adds pagination links at the described locations: above the posts, below them or both above and below the posts.
If you use pagination, a field for setting the posts per page appears.
There is also an option to display text when no posts found.
More tab:
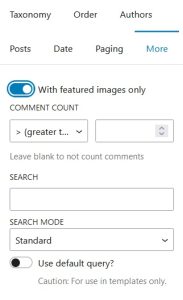
This tab contains filters that do not fall into the others.
The first option is a toggle labeled With featured images only. If on, only posts with featured images will be displayed.
Next comes the Comment count. To filter posts by number of comments you need to set the right comparison for you and to fill the desired number. For example, if you want to display posts that has at least 5 comments, you should set this option to > (greater than) 4.
The Search field is here for you, if you want to additionally filter the posts by keywords. Prepending a word with a hyphen (-) will avoid matching that word. For example -rock music will return posts that match music but not rock.
If Standard is selected in Search mode, it acts as using the default WordPress search, which means it searches in title and content. You can also try the two different modes.
In title only – Filters the posts whose titles has the keywords.
Title starts with – Filters the posts whose titles starts with the string in the search field (case insensitive).
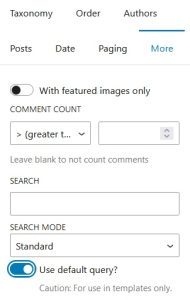
The option, labeled Use default query, is to be used only in templates. It switches to the default WordPress query. For example, you can modify your theme’s search template to display posts with your desired layout. To do this, you must use a Block theme. Go to Appearance > Editor > Patterns and click Add New Pattern. The pattern must contain the Showcase block. To configure it, all you need is to set the desired layout and to turn on the Use default query option. Save the pattern and use it inside a template: again in the Theme editor, choose Templates and edit the Search template. Add the pattern you just created and place it in the desired location. You can remove the default query loop. That’s all, save the pattern and try searching you site.
There is also another easier way, but not so customizable, to replace the search template as well as for other WP queries, like those when viewing a category or an author page. It is found in the Settings of the Showcase Creator admin menu – the Integration section.